Altered Balsa Box
This little box cost a dollar at Michael's. So, if it turns out like crap after you've tried your best to alter it's appearance into something more attractive than it's former self, it's not a total disappointment when one or two end up in the trash. Or, maybe that's just me? Here's my attempt to turn one into something a little more attractive than what this picture can possibly portray.
And how I did it...
Unscrew the little knob attach er thingy with a smaller than what's considered "normal" screwdriver (IMO).
Then cut off the useless elastic tie. I guess it's not totally useless because it holds the knob attacher thingy but it's really ugly....again (IMO). My opinion does matter. To me.
Paint it black!
Sorry...off subject!
After the paint dried I sprayed Lindy Stamp Gang Star burst in Golden Sleigh Bells. I purposely didn't saturate the box completely in black acrylic paint so the gold shimmer of the spray shined and enhanced the wood grain detail of the box.
It was actually an unplanned effect but I just thought it sounded better that way.
Pick out some patterned paper then put the box on the corner and trace with a pencil. Putting the box on the corner just saves space and extra cutting compared to placing it in the middle of the page. By all means, if you like extra steps and or moves because you're a mover and a shaker...Go for it!
Cut out the traced design.
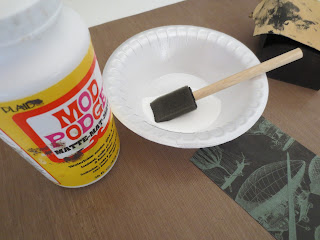
Adhere your paper to the box by coating both the box and paper with a thin layer of Mod Podge.
When the paper is adhered use a bra yer to evenly distribute the adhesive and ensure proper adhesion. Also, it's probably a good idea that you put the right side of your paper to the box...you know, the side you meant to show on the outside of the box (when you have double sided paper designs) because I didn't. Which means, the next step I had to do this...
Take an exacto knife and cut off the excess paper off the edges. Use a sanding tool to distress the edges for a seamless appearance. Oh and that knob attach er thingy, cut some of the patterned paper into a small circle and adhere it to the front of the knob. It'll match and look better (IMO).
My opinion does matter...
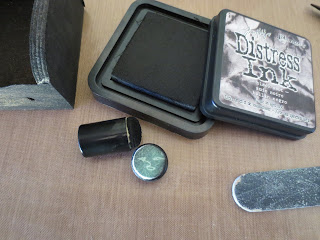
Ink all the edges of the box, including the knob attach er thingy, with black distress ink. It not only adds dimension but hides some of the paper piecing flaws that some (or just me) have.
I picked out metal embellishments along with paper flowers that I sprayed with the same Lindy Stamp Gang spray. I added a bit of ribbon, hot glued it all on and got this...
That's about as good as it gets for me these days. I've been in a bit of a crafting rut, so to speak. This box is for a swap I entered. I think it's a good idea to challenge yourself to creativity when it's evasive and doesn't come freely.
It happens...kinda like those two that ended up in the trash.
And how I did it...
Unscrew the little knob attach er thingy with a smaller than what's considered "normal" screwdriver (IMO).
Then cut off the useless elastic tie. I guess it's not totally useless because it holds the knob attacher thingy but it's really ugly....again (IMO). My opinion does matter. To me.
Paint it black!
After the paint dried I sprayed Lindy Stamp Gang Star burst in Golden Sleigh Bells. I purposely didn't saturate the box completely in black acrylic paint so the gold shimmer of the spray shined and enhanced the wood grain detail of the box.
It was actually an unplanned effect but I just thought it sounded better that way.
Pick out some patterned paper then put the box on the corner and trace with a pencil. Putting the box on the corner just saves space and extra cutting compared to placing it in the middle of the page. By all means, if you like extra steps and or moves because you're a mover and a shaker...Go for it!
Cut out the traced design.
Adhere your paper to the box by coating both the box and paper with a thin layer of Mod Podge.
When the paper is adhered use a bra yer to evenly distribute the adhesive and ensure proper adhesion. Also, it's probably a good idea that you put the right side of your paper to the box...you know, the side you meant to show on the outside of the box (when you have double sided paper designs) because I didn't. Which means, the next step I had to do this...
Take an exacto knife and cut off the excess paper off the edges. Use a sanding tool to distress the edges for a seamless appearance. Oh and that knob attach er thingy, cut some of the patterned paper into a small circle and adhere it to the front of the knob. It'll match and look better (IMO).
My opinion does matter...
Ink all the edges of the box, including the knob attach er thingy, with black distress ink. It not only adds dimension but hides some of the paper piecing flaws that some (or just me) have.
I picked out metal embellishments along with paper flowers that I sprayed with the same Lindy Stamp Gang spray. I added a bit of ribbon, hot glued it all on and got this...
That's about as good as it gets for me these days. I've been in a bit of a crafting rut, so to speak. This box is for a swap I entered. I think it's a good idea to challenge yourself to creativity when it's evasive and doesn't come freely.
It happens...kinda like those two that ended up in the trash.


Love it! Really great look!
ReplyDeletethanks always misty!
DeleteWow! What a transformation! I really love how this turned out, thanks for all the step by step photos and instructions!
ReplyDeletethank you Miriam, you're so awesome!
Deleteyou are invited to follow my blog
ReplyDeleteThanks, you're invited to follow mine Steve! ;)
ReplyDelete