My Fave Monday...Distress Marker Watercolor technique
A couple months ago I signed up for an amazing online class by the one and only, Tim Holtz! It was called Creative Chemistry 101. It basically went over all the different products he has, what they do and how to use them. After completing the class, I felt like I knew more about his products than most of the people selling them online and in my local scrapbook store. Of course, that could be my over inflated ego talking or the fact that knowledge is power baby!
The thing you should know first though, is that I'm so full of crap when I say I have an over inflated ego. And after that, pretty much everything I'm telling you is fact.
There was only one product I couldn't seem to get my hands on throughout the entire class and it was some Distress Markers . At the time, I guess they were brand new and the manufacturer hadn't anticipated such a high demand for the product and didn't make enough, yada, yada, yada...If you ask me, someone was asleep at the wheel on that decision, but what do I know?
Well, now that I have my hands on a few, I say a few because that's all I could get at the time, I can say I know a lot more than I did before taking Creative Chemistry 101 and I'd like to share with you!
I also recently saw this technique on You Tube from one of the channels I subscribe to. I don't make video tutorials (yet) so check her out here if you'd like to watch this technique in action.
You will need:
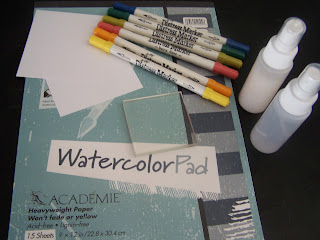
Distress Markers, Watercolor paper, acrylic block and a mister of water or pearl water. I pictured both because I wasn't sure which one I wanted to use. I ended up just using regular water on my final project.
 Then you are going to color your acrylic block with the Distress Markers. I chose several colors and used the brush tip of the marker in a back and forth motion to make strips of color covering the entire acrylic block.
 The great thing about Distress Markers is that you can't contaminate the tip. It doesn't matter if you're working dark to light or light to dark, the colors will just come off the tip after making a few scribbles on a scratch piece of paper.
 Now that the entire block is colored you spritz it with several sprays of water. I counted ten sprays when I did it. Distress Markers react with water and they blend effortlessly with no muddying up of colors.
 Once you have sprayed your block of ink then you can transfer that ink onto your watercolor paper simply by turning your block over and pressing it into your paper.
 Here you can see the colors and the water under the acrylic block soaking into the paper. It looks pretty cool, if you ask me.
 Once you've allowed the ink to sink into the paper you just the lift the block up and you're left with a beautiful watercolor pattern. It looks like a miniature painting. So pretty!
 After allowing the color to air dry, I stamped a greeting, tied some burlap twine around the paper and added some pearls.
 Here is the final card. I like how it has almost a beach feel to it. Very simple but pretty all the same.
I hope you try out this Distress Marker technique. It's my Fave this Monday!
The thing you should know first though, is that I'm so full of crap when I say I have an over inflated ego. And after that, pretty much everything I'm telling you is fact.
There was only one product I couldn't seem to get my hands on throughout the entire class and it was some Distress Markers . At the time, I guess they were brand new and the manufacturer hadn't anticipated such a high demand for the product and didn't make enough, yada, yada, yada...If you ask me, someone was asleep at the wheel on that decision, but what do I know?
Well, now that I have my hands on a few, I say a few because that's all I could get at the time, I can say I know a lot more than I did before taking Creative Chemistry 101 and I'd like to share with you!
I also recently saw this technique on You Tube from one of the channels I subscribe to. I don't make video tutorials (yet) so check her out here if you'd like to watch this technique in action.
You will need:

Distress Markers, Watercolor paper, acrylic block and a mister of water or pearl water. I pictured both because I wasn't sure which one I wanted to use. I ended up just using regular water on my final project.


I hope you try out this Distress Marker technique. It's my Fave this Monday!


Comments
Post a Comment